# 自定义节点
LogicFlow 的元素是基于 SVG 实现的,如果你对 SVG 的相关知识还不太熟悉,那么推荐你先了解一下 SVG (opens new window) 的基础内容。
# 原理
# 基于继承的自定义节点
LogicFlow 对外暴露了基础节点BaseNode和 5 个简单类型的节点:
RectNode、CircleNode、PolygonNode、EllipseNode、DiamondNode。
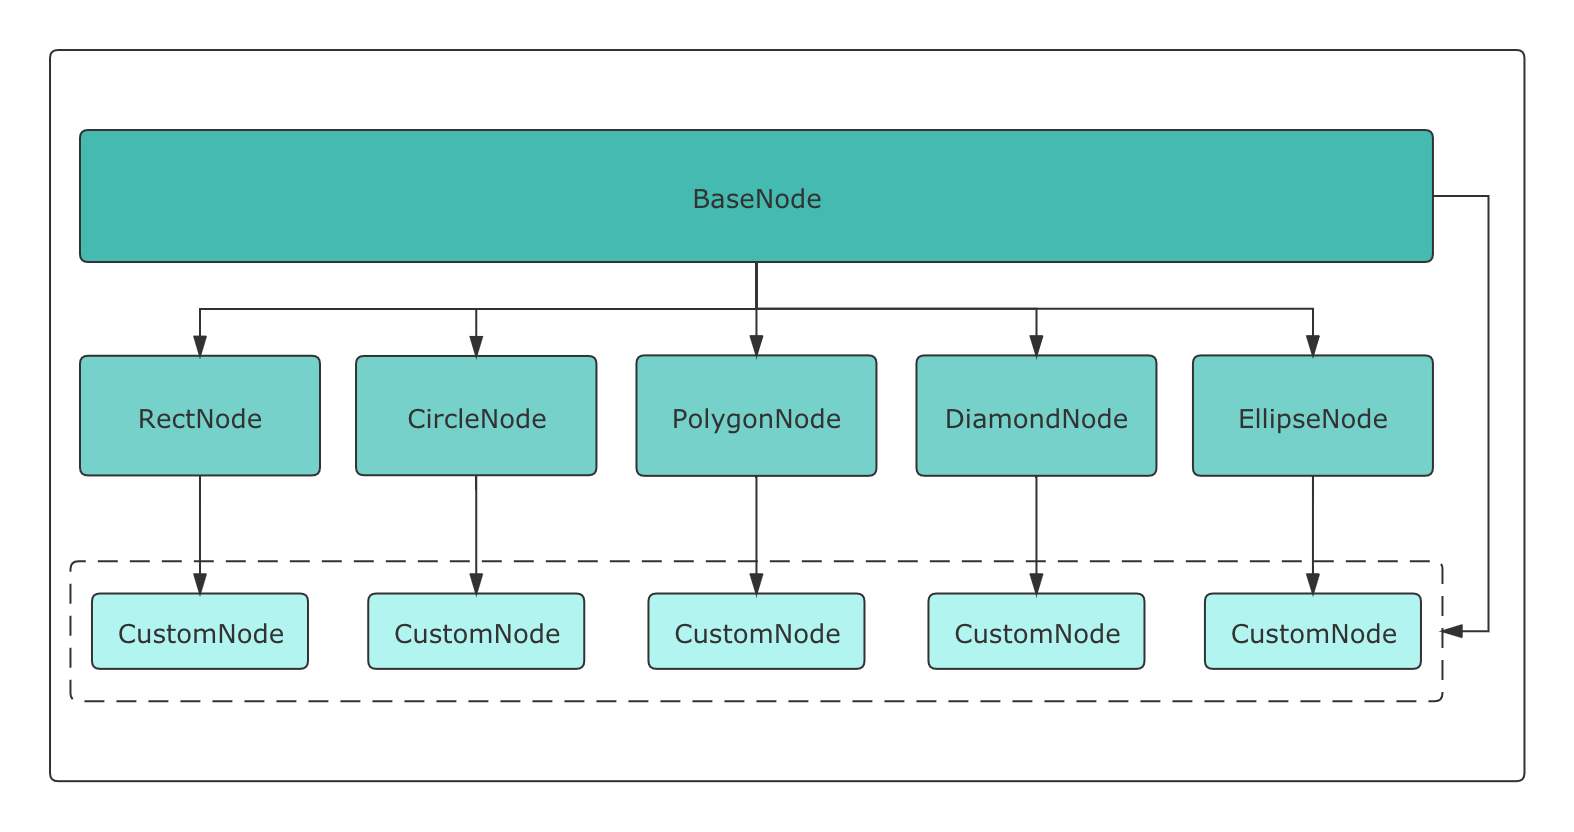
由上图可以看到,LogicFlow 提供的简单节点都继承自内部的BaseNode,因此,用户的CustomNode既可以继承简单类型节点实现,也可以直接通过继承BaseNode来实现。
# MVVM
LogicFlow 内部是基于MVVM模式进行开发的,分别使用preact和mobx来处理 view 和 model,所以当我们自定义节点的时候,需要为这个节点定义view和model。
# 注册自定义节点
我们可以在创建LogicFlow实例之后,render之前,使用register方法来注册自定义节点。
import { RectNode, RectNodeModel } from '@logicflow/core'

// 自定义节点的 model
class Model extends RectNodeModel {}
// 自定义节点的 view
class View extends RectNode {}


lf.register({
  type: 'customNodeType',
  view: View,
  model: Model,
});
register的第一个参数是自定义节点的类型,注册之后我们可以直接在lf.render()初始化时直接使用。
lf.render({
  nodes: [
    {
      id: 10,
      type: 'customNodeType',
      x: 300,
      y: 200,
    },
  ]
});
register的第二个参数可以为自定义节点定义view和model,register的第二个参数是一个回调函数,它的参数包含了 Logic Flow 内部所有节点的view和model,因此,我们可以通过继承这些内部的view和model来实现自定义节点的view和model,下文详细介绍了注册自定义节点的细节。
访问 API 来查看register提供的view和model全集。
# 自定义节点的 Model
一个节点的正常渲染所需要的各类数据都源自于model,节点的model中包含了以下内容:
不同类型的属性之间可能存在着依赖关系,为了保证每一种属性都可以正常使用,LF 在model的构造函数中按下图顺序进行初始化。
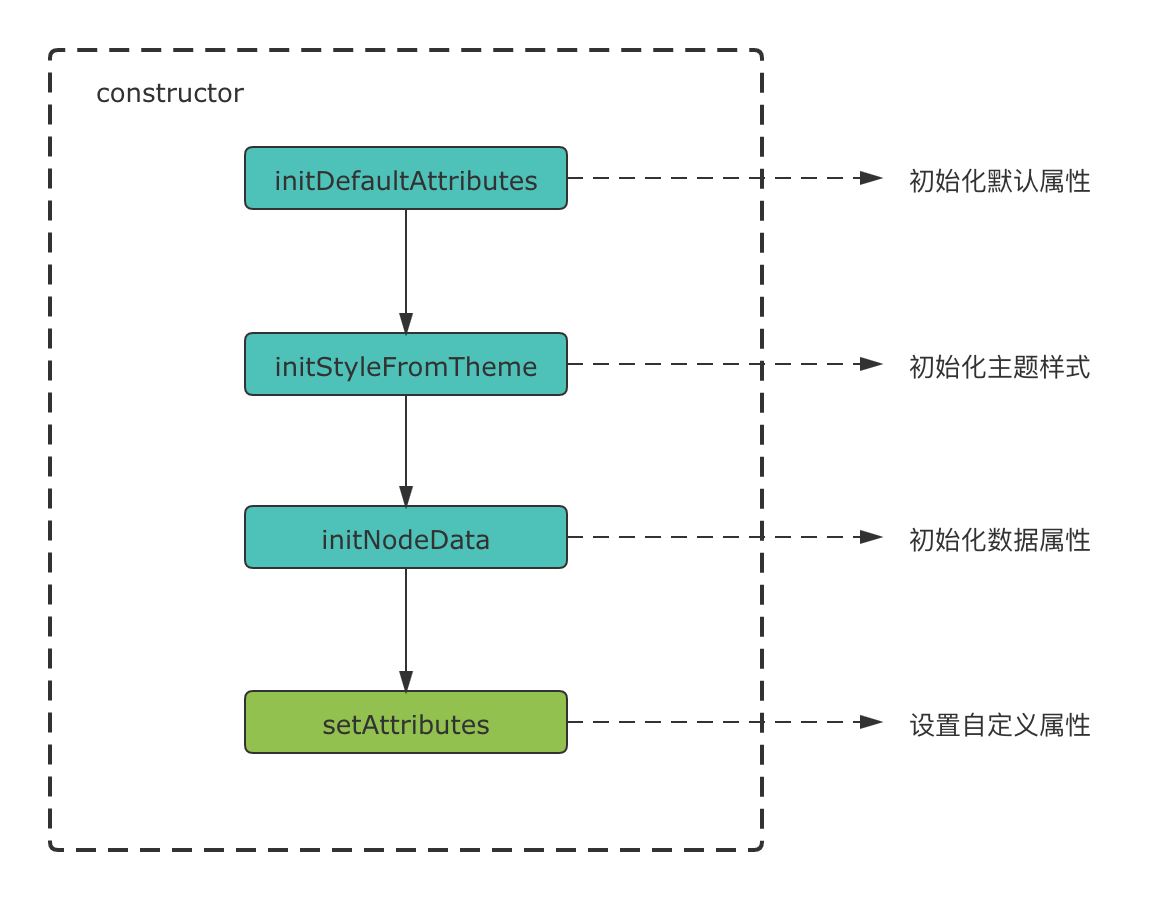
当各类属性被初始化完成后,LF 会主动调用setAttributes方法,因此我们可以用这个方法来对节点的属性进行自定义。
# 数据属性
从上图可以看到,数据属性在调用setAttributes之前就已经被初始化,它一般可以用来作为设置其他属性的依据。
class Model extends BaseNodeModel {
  setAttributes() {
    // 读取数据属性的 properties.color,并根据其值设置样式属性 stroke
    const { properties: { color } } = this;
    this.stroke = color;
  }
}
当接入方需要存放一些和节点相绑定的数据时,可以将其加入到properties中,Logic Flow 内部不会使用它,properties是自定义能力中最核心的一部分,通过properties可以实现业务中大部分逻辑需求。
注意:我们不推荐在
setAttributes中对数据属性再做任何改动。
完整的数据类属性请访问 API 以查看更多细节。
# 样式属性
以正方形节点(square)为例,我们需要为节点设置width和height。
const { RectNode, RectNodeModel } from '@logicflow/core';
class SquareModel extends RectNodeModel {
  setAttributes() {
    const size = 80;
    this.width = size;
    this.height = size;
  }
}
lf.register({
  type: 'square',
  view: RectNode,
  model: SquareModel,
});

lf.render({
  nodes: [
    {
      id: 10,
      type: 'square',
      x: 300,
      y: 200,
      text: '正方形',
      properties: {}
    },
  ]
});
完整的的样式类属性请访问 API 以查看更多细节。
# 附加属性
我们可以通过附加属性为节点设置锚点的数量和位置、连线时的校验规则、特有的菜单选项。
# 设置锚点的数量和位置
以正方形节点为例,如果我们只想使用水平方向上的左右两个锚点,则需要设置附加属性anchorsOffset。
import { RectNode, RectNodeModel } from '@logicflow/core';

class SquareModel extends RectNodeModel {
  setAttributes() {
    const size = 80;
    this.width = size;
    this.height = size;
    // 设置自定义锚点
    // 只需要为每个锚点设置相对于节点中心的偏移量
    this.anchorsOffset = [
      [size / 2, 0], // x 轴上偏移 size / 2
      [-size / 2, 0], // x 轴上偏移 -size / 2
    ];
  }
}
lf.register({
  type: 'square'
  view: RectNode,
  model: SquareModel,
});

lf.render({
  nodes: [
    {
      id: 10,
      type: 'square',
      x: 300,
      y: 200,
      text: '正方形',
      properties: {}
    },
  ]
});
在上例中,我们为anchorsOffset设置了一个数组,数组的每一项都是锚点相对于节点中心(x, y)的偏移量,例如[size / 2, 0]表示在 x 轴方向上从节点中心向右偏移宽度的一半,y 轴方向上不偏移。
# 设置连线时的校验规则
在某些时候,我们可能需要控制连线的连接方式,比如开始节点不能被其它节点连接、结束节点不能连接其他节点、用户节点后面必须是判断节点等,要想达到这种效果,我们需要为节点设置以下两个属性。
sourceRules- 当节点作为连线的起始节点(source)时的校验规则targetRules- 当节点作为连线的目标节点(target)时的校验规则
以正方形(square)为例,在连线时我们希望它的下一节点只能是圆形节点(circle),那么我们应该给square添加作为source节点的校验规则。
import { RectNode, RectNodeModel } from '@logicflow/core';
class SquareModel extends RectNodeModel {
  setAttributes() {
  const size = 80;
  const circleOnlyAsTarget = {
    message: "正方形节点下一个节点只能是圆形节点",
    validate: (source: any, target: any) => {
      return target.type === "circle";
    },
  };

  this.width = size;
  this.height = size;
  this.anchorsOffset = [
    [size / 2, 0],
    [-size / 2, 0]
  ];
  this.sourceRules.push(circleOnlyAsTarget);
}
lf.register({
  type: 'square'
  view: RectNode,
  model: SquareModel,
});

lf.render({
  nodes: [
    {
      id: 10,
      type: 'square',
      x: 300,
      y: 200,
      text: '正方形',
      properties: {}
    },
  ]
});
在上例中,我们为model的sourceRules属性添加了一条校验规则,校验规则是一个对象,我们需要为其提供messgage和validate属性。
message属性是当不满足校验规则时所抛出的错误信息,validate则是传入规则检验的回调函数。validate方法有两个参数,分别为连线的起始节点(source)和目标节点(target),我们可以根据参数信息来决定是否通过校验,其返回值是一个布尔值。
当我们在面板上进行连线操作的时候,Logic Flow 会校验每一条规则,只有全部通过后才能连接。
在连线时,当鼠标松开后如果没有通过自定义规则(validate方法返回值为false),Logic Flow 会对外抛出事件connection:not-allowed。
lf.on('connection:not-allowed', (msg) => {
  console.log(msg)
});
# 特有的菜单选项
自定义节点的菜单功能依赖于 @logicflow/extension 拓展包的菜单组件。
class Model extends BaseNodeModel {
  setAttributes() {
    this.menu = [
      {
        text: '删除',
        callback(node) {
          // node为该节点数据
          lf.deleteNode(node.id);
        },
      },
    ]
  }
}
在model中,我们可以直接设置menu属性以达到只为某一类节点设置菜单的效果,menu的类型是一个数组,数组的元素表示菜单项,菜单项的具体配置请查看拓展包中的菜单配置项。
为某一种类型的节点设置菜单,并不是只有设置
model的menu这一种方式,更便于自定义的方式是直接通过事件系统来监听右键事件,然后根据事件所返回的数据去渲染自己的组件,实际上,@logicflow/extension中的菜单组件就是基于这个机制开发的。
完整的附加类属性请访问 API 以查看更多细节。
# 定义节点id生成规则
默认情况下,初始化节点(连线)的时候,如果不传入节点(连线)id, logicflow内部会自动使用uuidv4生成节点(连线)的id. logicflow提供了自定义id生成规则的方式。
方式1: 重写createId方法
class UmlModel extends HtmlNodeModel {
  createId () {
    return Math.random() + '_uml'
  }
  setAttributes() {
    const width = 200;
    const height = 130;
    this.width = width;
    this.height = height;
    const properties = this.properties;
    this.anchorsOffset = [
      {
        x: width / 2,
        y: 0,
        isSourceAnchor: false,
        isTargetAnchor: true,
      }
    ]
  }
}
方式2:全局定义
const lf = new LogicFlow({
  container: document.querySelector('#app'),
  // 全局自定义id
  idGenerator(type) {
    return type + '_' + Math.random()
  }
});
在两种方式都存在的同时,优先级 方式1 > 方式2.
注意,自定义id只支持同步的方式,详细见issue#272 (opens new window)
# 简单节点的节点属性
不同形状的简单节点所对应的 SVG 标签不同,其所需要的标签属性也略有不同,例如圆形需要设置半径r,椭圆需要设置 x 轴半径rx和 y 轴半径ry等。
如果我们需要通过继承多边形(Polygon)来实现一个三角形的节点,则需要为多边形设置节点属性points。
import { PolygonNode, PolygonNodeModel } from '@logicflow/core';
class TriangleModel extends PolygonNodeModel {
  setAttributes() {
    this.points = [
      [50, 0],
      [100, 80],
      [0, 80],
    ];
  }
}
lf.register({
  type: 'triangle',
  view: PolygonNode,
  model: TriangleModel,
});
完整的节点属性请访问 API 以查看更多细节。
# graphModel
graphModel表示整个流程图对应的Model, 里面记录图的常用操作方法和数据API。
在自定义节点Model中,可以使用this.graphModel访问。例如在自定义连线的时候
# 自定义节点的 View
节点在view中维护了自身的VNode,Logic Flow 渲染节点时会调用view中的getShape方法来确定VNode该如何渲染。
# getShape
getShape方法可以返回任意 SVG 能识别的标签,目前需要使用 Logic Flow 提供的 h 方法来创建 SVG 元素。
仍然以正方形(square)节点为例,现在我们需要在正方形的左上角添加一个图标。
const { RectNode, RectNodeModel, h } = '@logicflow/core';
class SquareModel extends RectNodeModel {
  setAttributes() {
    const size = 80;
    const circleOnlyAsTarget = {
      message: "正方形节点下一个节点只能是圆形节点",
      validate: (source: any, target: any) => {
        return target.type === "circle";
      },
    };

    this.width = size;
    this.height = size;
    this.anchorsOffset = [
      [size / 2, 0],
      [-size / 2, 0]
    ];
    this.sourceRules.push(circleOnlyAsTarget);
  }
}
class SquareView extends RectNode {
  getShape() {
    // 通过 getAttributes 获取 model 中的属性
    const { x, y, width, height, fill, stroke, strokeWidth } = this.getAttributes();
    const attrs = {
      // rect 标签的 x,y 对应的是图形的左上角
      // 所以我们要将矩形的中心移动到 x,y
      x: x - width / 2,
      y: y - height / 2,
      width,
      height,
      stroke,
      fill,
      strokeWidth
    }
    // getShape 的返回值是一个通过 h 方法创建的 svg 元素
    return h("g", {}, [
        h("rect", { ...attrs }),
        h(
          'svg',
          {
            x: x - width / 2 + 5,
            y: y - height / 2 + 5,
            width: 25,
            height: 25,
            viewBox: "0 0 1274 1024",
          },
          h(
            'path',
            {
              fill: stroke,
              d:
                "M655.807326 287.35973m-223.989415 0a218.879 218.879 0 1 0 447.978829 0 218.879 218.879 0 1 0-447.978829 0ZM1039.955839 895.482975c-0.490184-212.177424-172.287821-384.030443-384.148513-384.030443-211.862739 0-383.660376 171.85302-384.15056 384.030443L1039.955839 895.482975z",
            }
          )
        )
      ]
    );
  }
}
lf.register({
  type: 'square',
  view: SquareView,
  model: SquareModel,
});

// 配置节点
lf.render({
  nodes: [
    {
      id: 10,
      type: 'square',
      x: 300,
      y: 200,
      text: '正方形',
      properties: {}
    },
  ]
});
在上面的代码中,getShape方法返回了一个包含图标的标签,Logic Flow 拿到这个返回值后会直接在graph中进行渲染。SVG 元素需要 model 中的实时数据才可以正常显示并使用,现在我们可以通过getAttributes方法获取到 model 中的数据属性和样式属性。
# 自定义HTML节点
LogicFlow内置了基础的HTML节点,我们可以利用LogicFlow的自定义机制,实现各种形态的HTML节点,而且HTML节点内部可以使用任意框架进行渲染。
class UmlModel extends HtmlNodeModel {
  setAttributes() {
    this.text.editable = false; // 禁止节点文本编辑
    // 设置节点宽高和锚点
    const width = 200;
    const height = 130;
    this.width = width;
    this.height = height;
    this.anchorsOffset = [
      [width / 2, 0],
      [0, height / 2],
      [-width / 2, 0],
      [0, -height/2],
    ]
  }
}
class UmlNode extends HtmlNode {
  currrentProperties: string;
  // 由于setHtml会跟随节点的render触发
  // 所以自定义html节点需要自己判断组件是否需要更新。
  // setHtml除了properties发生变化会触发外,节点移动了,
  // 节点被选中了等model上所有的属性发生变化都会触发。
  shouldUpdate() {
    const { properties } = this.getAttributes();
    if (this.currrentProperties && this.currrentProperties === JSON.stringify(properties)) return false;
    this.currrentProperties = JSON.stringify(properties)
    return true;
  }
  setHtml(rootEl: HTMLElement) {
    const { properties } = this.getAttributes();
    if (!this.shouldUpdate()) return;

    const el = document.createElement('div');
    el.className = 'uml-wrapper';
    const html = `
      <div>
        <div class="uml-head">Head</div>
        <div class="uml-body">
          <div>+ ${properties.name}</div>
          <div>+ ${properties.body}</div>
        </div>
        <div class="uml-footer">
          <div>+ setHead(Head $head)</div>
          <div>+ setBody(Body $body)</div>
        </div>
      </div>
    `
    el.innerHTML = html;
    // 需要先把之前渲染的子节点清除掉。
    rootEl.innerHTML = '';
    rootEl.appendChild(el);
  }
}
# 使用react编写html节点
以为自定义html节点对外暴露的是一个DOM节点,所以你可以使用框架现有的能力来渲染节点。在react中,我们利用reactDom的render方法,将react组件渲染到dom节点上。
import { HtmlNodeModel, HtmlNode } from '@logicflow/core';
import React from 'react';
import ReactDOM from 'react-dom';
import './uml.css';

function Hello(props) {
  return (
    <>
      <h1 className="box-title">title</h1>
      <div className="box-content">
        <p>{props.name}</p>
        <p>{props.body}</p>
        <p>content3</p>
      </div>
    </>
  )
}

class BoxxModel extends HtmlNodeModel {
  setAttributes() {
    this.text.editable = false;
    const width = 200;
    const height = 116;
    this.width = width;
    this.height = height;
    this.anchorsOffset = [
      [width / 2, 0],
      [0, height / 2],
      [-width / 2, 0],
      [0, -height/2],
    ]
  }
}
class BoxxNode extends HtmlNode {
  setHtml(rootEl: HTMLElement) {
    const { properties } = this.getAttributes();
    ReactDOM.render(<Hello name={properties.name} body={properties.body}/>, rootEl);
  }
}

const boxx = {
  type: 'boxx',
  view: BoxxNode,
  model: BoxxModel
}

export default boxx;
// page.jsx

import box from './box.tsx';
export default function PageIndex() {
  useEffect(() => {
    const lf = new LogicFlow({
      ...config,
      container: document.querySelector('#graph_html') as HTMLElement
    });
    lf.register(box);
    lf.render({
      nodes: [
        {
          id: 11,
          type: 'boxx',
          x: 350,
          y: 100,
          properties: {
            name: 'turbo',
            body: 'hello'
          }
        },
      ]
    });
    lf.on('node:click', ({ data}) => {
      lf.setProperties(data.id, {
        name: 'turbo',
        body: Math.random()
      })
    });
  }, []);

  return (
    <>
      <div id="graph_html" className="viewport" />
    </>
  )
}